
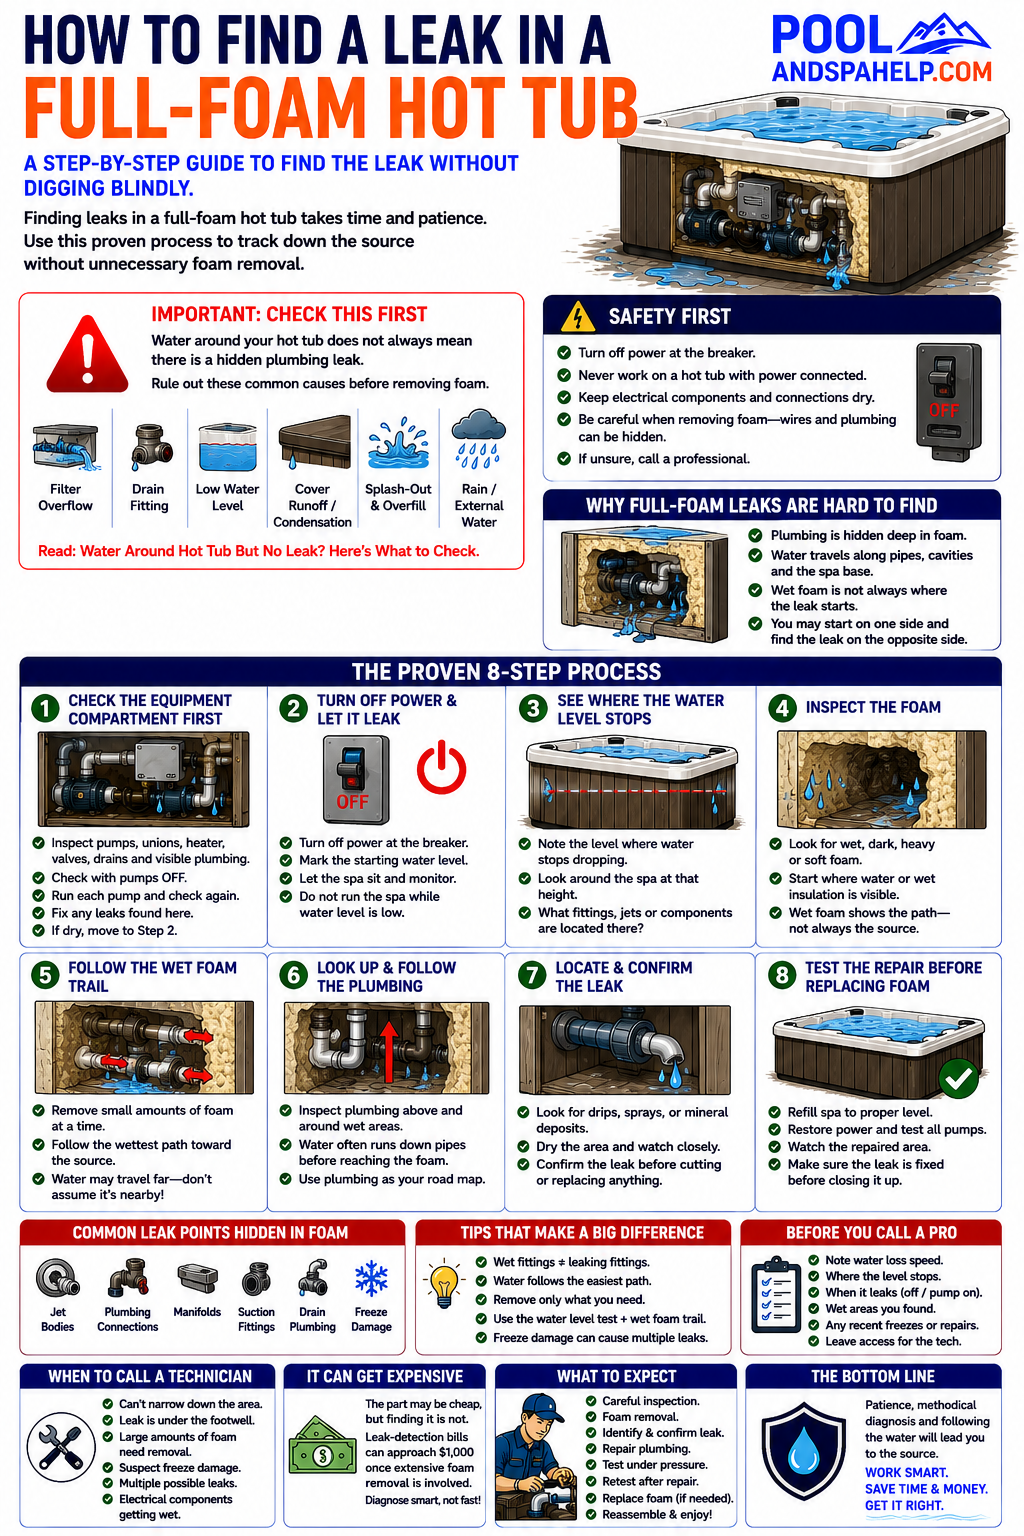
Finding a leak in a full-foam hot tub can be one of the most frustrating and time-consuming hot tub repairs.
You open the equipment compartment.
Nothing.
You remove another cabinet panel and find wet foam.
So you start digging.
An hour later you’re surrounded by pieces of insulation—and you still haven’t found the leak.
Unfortunately, water doesn’t always travel straight down from the leaking component. It can follow plumbing, cavities, and paths through the insulation before finally appearing somewhere completely different.
I’ve worked on plenty of full-foam hot tub leaks, and they’re not repairs I particularly enjoy. Finding the leak can take considerably longer than actually fixing it.
The most important thing is not to start removing foam blindly.
First, confirm that the spa really is leaking and use the water itself to narrow down the possible location.
Important: Before You Start Digging Through Foam
Water underneath your hot tub does not necessarily mean there’s a hidden plumbing leak.
Before removing insulation, rule out the easier possibilities.
Water around a hot tub can come from:
- A filter-area overflow hose
- An exterior drain fitting
- Low water allowing upper jets to spray against the cover
- Cover condensation
- Splash-out
- An overfilled spa
- Rain or snowmelt
- Water draining underneath the spa from somewhere else
I’ve seen leak diagnosis become extremely expensive once someone starts unnecessarily removing foam.
Before you start digging, read: Water Around Hot Tub But No Leak? Here’s What to Check
If you’ve ruled those possibilities out and confirmed the spa is actually losing water, then it’s time to start narrowing down the leak.
Why Full-Foam Hot Tub Leaks Are Difficult to Find
In a hot tub without full-foam insulation, you can often remove a cabinet panel and visually inspect much of the plumbing.
A full-foam spa is different.
Much of the plumbing may be completely buried in insulation.
You may be looking for:
- A leaking jet body
- Cracked plumbing fitting
- Loose connection
- Split hose
- Manifold leak
- Suction fitting leak
- Freeze-damaged plumbing
And all of it may be hidden behind several inches of foam.
Worse, the place where you find water isn’t necessarily where the leak is located.
Water follows the easiest path.
I’ve started investigating wet foam on one side of a hot tub only to eventually find the actual leak on the complete opposite side.
That’s why randomly digging toward a wet spot can turn into hours of unnecessary work.
Safety First
Before digging into a full-foam hot tub, shut off power at the breaker.
You’re going to be working around:
- Hidden electrical wiring
- Pumps
- Control systems
- Plumbing
- Water
- Potentially wet insulation
Never dig blindly into foam with sharp tools.
Electrical wires, sensor cables, air lines, and plumbing can all be hidden inside the insulation.
You don’t want to turn one leak into several additional repairs.
If you’re unsure what you’re cutting or digging around, stop.
Step 1: Check the Equipment Compartment First
Even on a full-foam hot tub, I always start with the equipment area.
There are simply too many potential leak points concentrated there to ignore it.
Inspect:
- Pump unions
- Pump seals
- Pump housings
- Heater unions
- Heater assembly
- Valves
- Drain plumbing
- Visible fittings
- Accessible hoses and plumbing
Check everything with the pumps off.
Then run each pump and inspect again.
Some leaks only become obvious when the plumbing is under pressure.
If you find the leak here, congratulations.
You may have just avoided digging through foam entirely.
Step 2: Turn the Power Off and Let the Hot Tub Leak
If the equipment area is dry and you’ve confirmed the spa really is losing water, I find it helpful to turn the power off and let the hot tub sit.
Then monitor the water level.
This does two useful things.
First, it prevents the pumps and heater from operating as the water level drops.
Second, the point where the water stops dropping can provide an important clue about where the leak is located.
Mark the starting water level with a piece of removable tape and check it periodically.
Do not turn the spa back on while the water level is low.
Step 3: See Where the Water Level Stops
Suppose the water level drops several inches and then stops.
Look around the spa at that height.
What components are located there?
Possible leak points include:
- Jets
- Jet bodies
- Lights
- Suction fittings
- Plumbing connections
- Other shell penetrations
Here’s a simple example.
The spa loses water until the level reaches just below one particular jet.
It then stops.
If that jet is the only shell fitting at approximately that height, there’s a good likelihood that the jet or its associated plumbing is involved.
That doesn’t prove the jet itself is leaking.
There may be plumbing connected to it behind the shell.
But you’ve narrowed a hot tub containing dozens of fittings down to a much smaller area.
That’s considerably better than blindly removing foam.
What If the Water Doesn’t Stop Dropping?
If the water continues dropping toward the bottom of the footwell, the leak may be lower in the spa.
Possible causes include:
- Lower jets
- Suction fittings
- Lower plumbing
- Drain plumbing
- Plumbing underneath the footwell
- Cracked fittings
These leaks can be particularly difficult because access may be limited.
At this point, the water level has still given you useful information.
Instead of searching every jet and fitting near the top of the spa, you can concentrate on lower plumbing.
Step 4: Inspect the Foam
Once the water level has given you whatever information it can, begin inspecting the insulation.
You’re looking for differences in the foam.
Dry foam and wet foam usually look and feel different.
Depending on the type of insulation, wet foam may be:
- Darker
- Heavier
- Softer
- Saturated
- Cooler to the touch
Start where water or wet insulation is visible.
But remember:
Wet foam tells you where water traveled. It doesn’t necessarily tell you where the leak started.
Step 5: Follow the Wet Foam
Now comes the slow part.
Begin carefully removing wet foam and following the moisture.
Work gradually.
Don’t excavate a giant section of insulation simply because you’ve found one wet area.
Instead:
- Expose a small area.
- Determine which direction the moisture continues.
- Remove another small amount.
- Check again.
- Keep following the wettest path.
Think of the wet foam as a trail.
You’re trying to follow that trail backward toward its source.
The Leak May Be Nowhere Near the Wet Spot
This is one of the biggest mistakes people make when searching for leaks in full-foam hot tubs.
They find wet foam on the left side of the spa and assume:
The leak must be on the left side.
Not necessarily.
Water may run:
- Along a plumbing line
- Around the shell
- Through gaps in the insulation
- Downward through cavities
- Along the spa base
- Across large sections of the cabinet
I’ve followed wet foam and eventually found the actual leak on the opposite side of the hot tub.
Follow the evidence rather than assuming the nearest fitting is responsible.
Look Up, Not Just Down
Gravity still matters.
If you uncover wet foam, inspect above that area before automatically digging downward.
Look for:
- Plumbing directly above
- Jet bodies
- Hose connections
- Manifolds
- Water trails along pipes
Water may be running down a pipe before soaking into the foam farther away.
Sometimes following the plumbing upward gets you to the source faster than following the wettest insulation downward.
Use Plumbing as a Road Map
Once you’ve exposed a plumbing line, don’t necessarily remove all the foam around it.
Try to determine where that pipe goes.
Does it lead toward:
- A jet at the waterline where the spa stopped leaking?
- A manifold?
- A suction fitting?
- Another group of jets?
Combining the water-level test with the wet-foam trail is much more useful than either method alone.
For example:
Water stops below a particular jet level + wet foam trail leads toward that same area = a much stronger suspect.
Look for Mineral Deposits
A leak doesn’t always produce an obvious stream of water.
Once you’ve exposed plumbing, look for:
- White crusty deposits
- Discoloration
- Mineral buildup
- Water stains
These deposits can form where small amounts of water have repeatedly leaked and evaporated.
They can help identify a slow leak even when the fitting isn’t actively dripping during your inspection.
Don’t Assume the First Wet Fitting Is the Leak
This one can save you from replacing perfectly good parts.
If water has traveled along a plumbing line, several fittings may be wet.
Dry the exposed area thoroughly if possible.
Then determine where fresh water first appears.
The fitting that’s wet isn’t necessarily the fitting that’s leaking.
What About Running the Pumps?
The way the leak behaves can provide another clue.
Leaks With the Pumps Off
If the spa continues losing water while sitting powered off, the leak is likely somewhere below the current waterline where gravity can continue feeding it.
Leaks That Become Worse With a Pump Running
If you’ve exposed the suspected area and can safely test the spa, some leaks become much easier to identify when the plumbing is pressurized.
You may see:
- Dripping become a stream
- Water spray from a fitting
- A cracked connection open slightly
- Water suddenly enter previously dry foam
However, don’t run the spa with an unsafe water level, and never energize equipment if water is reaching electrical components.
Refill to the proper level before performing an operational test.
Common Leak Points Inside Full-Foam Hot Tubs
Once you’re into the foam, some of the common places to inspect include:
Jet Bodies
Jet bodies penetrate the hot tub shell and connect to plumbing behind it.
Leaks may develop around:
- Jet-body seals
- Plumbing connections
- Cracked jet bodies
Manifolds
A manifold distributes water from a larger plumbing line to several smaller lines.
A cracked manifold or failed connection can be difficult to see until enough foam has been removed.
Plumbing Connections
Hose connections and glued fittings can eventually develop leaks.
Suction Fittings
Suction fittings are often located lower in the spa and can continue leaking as the water level falls.
Freeze-Damaged Plumbing
Freeze damage deserves special attention.
Frozen water can crack:
- Fittings
- Manifolds
- Jet bodies
- Pumps
- Heater components
- Plumbing lines
And unfortunately, freeze damage can produce more than one leak.
Finding one cracked fitting doesn’t necessarily mean you’re finished.
Be Careful With Foam Removal
It’s tempting to attack the insulation aggressively once you’re frustrated.
Don’t.
Hidden inside that foam may be:
- Plumbing
- Small hoses
- Air lines
- Electrical wiring
- Sensor wires
- Light wiring
Use your hands and relatively gentle tools whenever practical.
If you use a cutting tool, make shallow, controlled cuts where you know what’s behind the foam.
Creating a second leak while searching for the first one makes for a particularly bad afternoon.
Remove Only as Much Foam as Necessary
You don’t need the entire side of the hot tub exposed to repair one fitting.
Once you’ve positively located the leak, remove enough insulation to:
- Clearly see the damaged component
- Safely access it
- Cut plumbing if necessary
- Install the repair
- Test the repair
The more foam you remove, the more you’ll eventually have to replace or otherwise deal with.
Confirm the Leak Before Repairing It
Before cutting plumbing or replacing components, make sure you’ve found the actual source.
Dry the area.
Add water if necessary.
Watch the fitting.
If appropriate and safe, test it under both static conditions and with the pump running.
You want to see water originate from the suspected component.
After spending hours reaching a buried fitting, the last thing you want to do is replace it and discover that the real leak is six inches farther up the plumbing.
Test the Repair Before Replacing Insulation
Once the repair is complete, don’t immediately cover everything back up.
Refill the hot tub to the correct level.
Restore power when it is safe to do so.
Then test:
- With the pumps off
- With each pump running
- At different pump speeds if applicable
- With affected jets operating
Watch the repaired area carefully.
Give it enough time to confirm that it stays dry.
Only after you’re satisfied that the leak is repaired should you deal with replacing the insulation and closing the cabinet.
Remember: There May Be More Than One Leak
This is especially important after freeze damage.
You find one cracked fitting.
You repair it.
You refill the spa.
And there’s still water appearing.
That doesn’t necessarily mean the repair failed.
There may be another leak.
After repairing any significant leak, inspect the surrounding plumbing and continue monitoring the water level.
Why Full-Foam Leak Repairs Can Get Expensive
The actual failed part may be inexpensive.
The labour required to find it may not be.
A buried fitting might only take a short time to repair once exposed.
But reaching it can require:
- Removing cabinet panels
- Removing insulation
- Following wet foam
- Exposing plumbing
- Repeatedly filling and testing the spa
- Repairing the plumbing
- Retesting
- Dealing with the removed insulation
- Reassembling the cabinet
I’ve seen leak-detection bills approach $1,000 once extensive foam removal and troubleshooting are involved.
That’s why I don’t recommend immediately digging into foam simply because there’s water underneath a hot tub.
Spend the easy diagnostic time first.
It can potentially save hours of expensive labour later.
When to Call a Hot Tub Technician
Full-foam leak detection can quickly become a substantial project.
Consider calling a technician if:
- The water level keeps dropping but you can’t narrow down the area.
- The leak appears to be underneath the footwell.
- Large amounts of insulation must be removed.
- You suspect freeze damage.
- Plumbing needs to be cut and rebuilt.
- Electrical components are getting wet.
- You don’t have safe access to the suspected area.
- You’ve found multiple possible leak locations.
If you do call for service, tell the technician where the water level stops and which areas of the cabinet you’ve found wet.
Those clues can save diagnostic time.
Preparing for a Service Call
Before the technician arrives, note:
- How quickly the water level drops
- Where the water level eventually stops
- Whether it leaks with the power off
- Whether the leak becomes worse with a particular pump running
- Which cabinet areas contain wet foam
- Whether the hot tub recently froze
- Whether any recent repairs were performed
- Whether you’ve already ruled out the drain and filter overflow
Photos can be useful too.
If you’ve already exposed a wet area, leave it accessible rather than covering everything back up.
Frequently Asked Questions
How do you find a leak in a full-foam hot tub?
First rule out external sources and check the equipment compartment. If the spa is definitely leaking, turn the power off and monitor how far the water level drops. Then use the stopping water level and the trail of wet foam to narrow down the source.
Should I remove all the wet foam?
Usually not. Remove foam gradually and follow the moisture toward its source. Large-scale foam removal can add significant time to the repair and may expose or damage other components unnecessarily.
Does wet foam mean the leak is directly behind it?
No. Water can travel surprisingly long distances through and around hot tub insulation. The actual leak may be located far from where the wet foam first appears.
Why should I turn the hot tub off and let it leak?
If the leak is below the waterline, the level may eventually stop falling when it reaches the approximate height of the leaking component. This can help narrow down which jets, fittings, or plumbing areas need to be inspected. Turning off the power also prevents the equipment from operating as the water level falls.
What if the hot tub drains almost to the bottom?
That points your investigation toward lower plumbing, suction fittings, drains, lower jets, or plumbing beneath the footwell.
Can a full-foam hot tub have multiple leaks?
Yes, particularly after freeze damage. Repairing one obvious leak doesn’t guarantee there isn’t another damaged fitting elsewhere.
How long does it take to find a leak in a full-foam hot tub?
It varies enormously. A leak near an accessible fitting may be found quickly, while one buried deep in insulation can require hours of careful leak detection and foam removal. In difficult cases, locating the leak takes considerably longer than repairing it.
The Bottom Line
Finding a leak in a full-foam hot tub requires patience.
And personally, it’s not a repair I particularly enjoy.
Before removing any foam:
Make sure the hot tub is actually leaking.
Then:
Check the equipment area → turn the power off → monitor where the water level stops → identify fittings at that height → find wet foam → follow the moisture trail → expose and confirm the actual leak.
Don’t assume the leak is directly behind the first wet insulation you find.
I’ve started on one side of a hot tub and followed the wet foam all the way to a leak on the opposite side.
The water will take whatever path is easiest.
Your job is to follow that path backward.
And when you finally reach the source, confirm the leak before cutting anything apart.
In a full-foam hot tub, the broken fitting may be the easy part.
Finding it is often the real repair.
Related Articles:
- Hot Tub Leaking? Here’s What to Check First
- Water Around Hot Tub But No Leak? Here’s What to Check
- Hot Tub Losing Water but No Leak? What to Check First
Written by Dan Harvickson (Founder of Last Mountain Tech) Pool and Spa Specialist